HOW TO USE DARK AND MOODY PHOTOGRAPHY FOR YOUR BRAND
- Lisa Haukom | Founder of The Goldenbrand Studio
- Jan 25, 2023
- 4 min read
Updated: Mar 19, 2023
There was a time when capturing engaging food photography made most people think about vibrant colors, light-toned hues, and bright luminosity. We are noticing a trend toward darker, more naturally lit images in our Instagram feed lately becoming extremely popular among creative communities, and with good reason! It’s artistic, impactful, and dynamic. It is so popular it's even trending among industries that typically prefer light and bright imagery. Interior photography, food and product photography, brand photography, wedding, and styled shoots are embracing more contrast between light and shadow, taking advantage of realistic, directional, natural light. We love the trend toward moody images and are showing you how to use the chiaroscuro effect in your brand imagery.

What is dark and moody photography?
The phrase “dark and moody” is frequently tossed around in photographer circles, but what does it mean? By encapsulating the light in moderation and surrounding it with beautiful shadows, we add depth to the frame and achieve a painterly result that evokes emotion and makes a vivid, long-lasting impression. Keep in mind there are degrees of moody and for that, we need to talk about light.
Moody photos can be created in different ways. Listed below are some of the tips and tricks that can help you create compelling moody portrait, lifestyle, and brand photos.
Lighting your moody photo
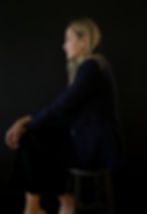
The above self-portrait is a more extreme example with only my skin tones reflecting light. Everything else is dark with depth and shadow prominent in the image. For this image, I used directional light (natural light coming from one direction), and a dark backdrop and simply captured how the light looked in person. This is a very liberating way to photograph! What could be easier than simply capturing natural light doing what it does best?
The series of images below are excellent examples of what I'll call gently moody images. Each celebrates directional, natural light and shadows while highlighting the design details in each space. As you scroll through them you'll see them become progressively darker with more pronounced contrast and shadow.


Compare the above images with this light and bright interior space.

Window light is a great, accessible tool to achieve moodier lighting. Keep in mind that windows facing North (I am facing north in the above self-portrait) provide beautiful light for portraits, as their position prevents harsh light from spilling directly through them, maintaining softness all day. If your window faces East or West on a sunny day, it will produce hard light in the morning or evening, respectively. Not ideal for a moody image.
The size of your window and its position relative to your subject also affect the lighting of the image. Smaller windows (and light sources in general) will produce more contrasting light, while larger windows and light sources will be less contrasty.
In the image below there is one light source for this arrangement, streaming in from the left.

Play with Shadow
The best scenes naturally have shadows in most parts of the frame and leave only a specific area highlighted, making it a wonderful setting to create moody images. Try turning off all the overhead or existing lights in the space and closing all curtains except for one. Then, use only one light source from the remaining uncovered window to illuminate your subject. Place your subject at an angle to the window light and ask him or her to turn only their face towards it.
Remove unnecessary objects
Most moody photos are photographed under low-lit or dimly lit scenarios, naturally diluting many highlights in the picture so that the viewer’s focus or attention is easily drawn to a central subject or a well-lit subject within a dark space. It would be best if you steered clear of unnecessary objects around your main subject so that the viewer’s gaze remains where you want it to be. Moreover, having a lot of elements in the background can be distracting, so selectively arrange things to achieve the look you want.
Editing tip: If you cannot eliminate distractions when shooting, you can also consider adding a vignette later to darken down the edges of the image.
Use a monochrome color scheme
Introducing a monochrome color scheme can help make an image more dark and moody. Enhancing the shadows and increasing the contrast in a black and white image can help increase the moodiness. Whether you decide to photograph in black and white or add it in the post-production editing phase of your workflow, either way, it adds depth to your images.
Bring focus to the eyes
This is more about moody imagery than dark and moody, and your subject’s eyes can sometimes do more talking than the entire image. When framed right, since they are such a powerful facial element, eyes can add both impact and a hint of mystery in an image. Moreover, focusing on the subject’s eyes in a scenario where there are very few distracting elements in the background can make them appear even more fascinating.
Add Grain
Adding slight noise and grain to an image can sometimes make it look more artistic by giving it a more film-like look and can help enhance the scene’s dark and moody vibe.
Is moody photography right for you?
The answer here will depend on how you intend to use your images and how a moody photo will fit in with your overall aesthetic. That being said, there are certainly degrees of moodiness you can begin to incorporate into your project and brand images. Start by ditching the light and airy presets and embrace natural light and shadows. Go for a final edited look that celebrates warmth, contrast, and tone in your images instead of banishing all shadows.

Ask your photographer
Consider how taking photos more naturally and realistically might help to highlight your products and the work you do. Would it add to the detail in an image or detract from it? Ease into the trend in small steps and avoid going all in on it until you are sure it is right for you.
Share your ideas with your photographer, offering visual examples of your definition of dark and moody, before you book a session. This is important to note because of the varying degrees and range of light in a darker moody image, you want to be sure you are on the same page. I've started a dark and moody mood board for you here.
Up next:
